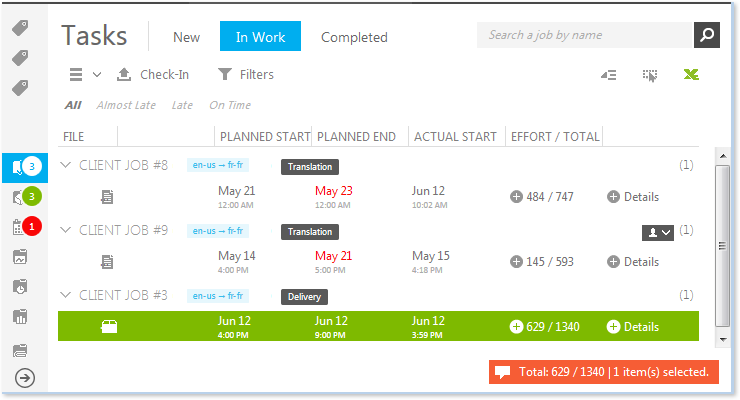
The Tasks | In Work view displays the tasks you have accepted.
In the Tasks | In Work view the tasks are marked with visual indicators that represent how the End Dates relate to the current day:
The filename is blue, when the file can be downloaded by clicking the filename. The filename is black, when the activity is not yet current, or was not executed or was canceled as the files do not exist yet.

To download the file(s) associated with the task, select the files in the In Work view, and select Check-Out in the Tasks | In Work Action menu. Selecting either Check-Out or Check-Out (references) in the list menu. The downloaded file is renamed with a Lionbridge Laꜞnguage Cloud™ Workflow system name (for example 6380c46f-2a2a-4151-a7e8-4e701a12e87f.zip). You can rename the zip file for your own purposes, if needed.
The folder structure of a decompressed ZIP package includes the following levels:
|
P11 (main folder)
|
You can include files from several tasks in one download by first selecting several tasks.
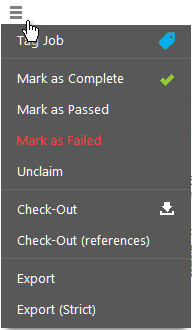 You can download the files to a local computer with their original name and path by clicking Advanced and selecting Export Files in the menu. This can be useful when a process has to be run on the files (compilation for instance), or for reference purposes.
If you select Export (Strict), the original files are exported in their original (uploaded) folder structure, without added target language folders. The resulting folder structure is simpler than with the Export mode and exporting files for several languages or activities can result in overwriting files inside the generated zip package when the paths are identical for different languages or activities.
You should however use the Check-Out command, when you want to download the files for normal processing. The Export Files command is for special purposes, like when a process has to be run on the files (compilation for instance), or for reference purposes.
Note: You cannot upload back to the Lionbridge Laꜞnguage Cloud™ Workflow system files downloaded to a local computer with the export function. You can check-in files to the Lionbridge Laꜞnguage Cloud™ Workflow only when you have used the check-out to save the files to a local computer.
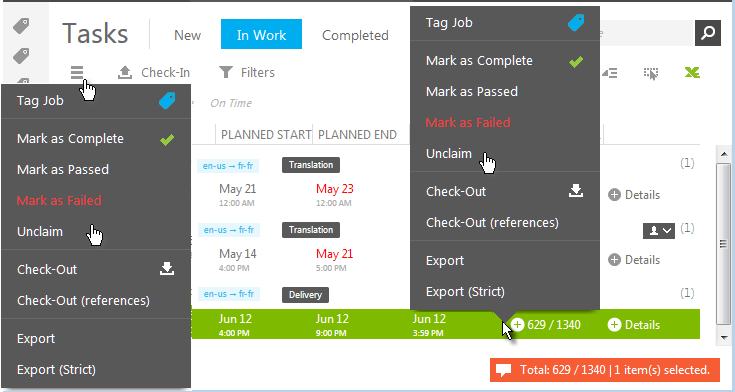
When the task is a Human Decision type task, for example the Review task, the user can mark a file as Passed or Failed.
If the user fails a file, Lionbridge Laꜞnguage Cloud™ Workflow displays a Mark Task as Failed dialog, for the user to enter a comment explaining why the selected file is marked as failed.
| Mark Task as Failed |
_ □ x |
Description
| Field/Value | Additional Information | |
|---|---|---|
|
|
Comment: * |
|
|
Some segments are not translated.
|
Insert the reason for failing the task in this field. | |
| Save |
||
This information is saved to the Excel report, which can be downloaded in the following workflow step, in this case by the user who is assigned for the Corrections task.
When she checks out for Corrections the file rejected in the Review, the then exported TaskMessage xlsx file includes the description from the MarkTask as Failed dialog comment field.
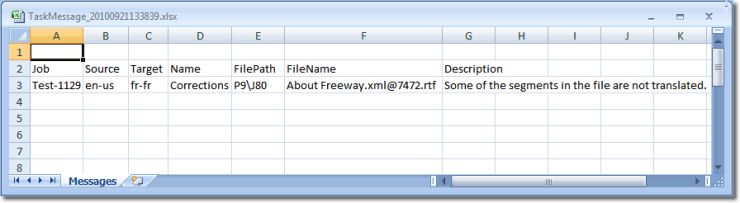
The user performing the Corrections task can then verify if the reason for the rejection corresponds to the contents of the rejected file.
Once you have completed your work, you should upload the files (which may not always be required).
You can include several files in one upload by compressing the files into one ZIP file. Uploaded files need to have the same names as when downloaded with the Check-out feature.
You can start uploading the files by clicking Check In in the Tasks | In Work view.
The Check-In dialog is displayed.
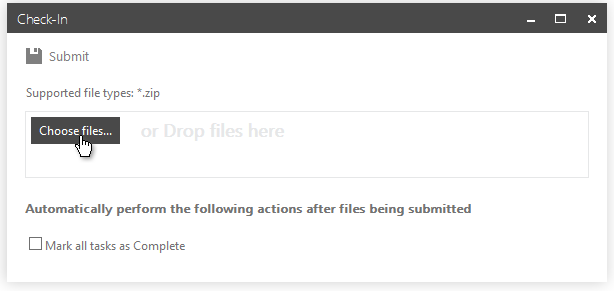
Click Choose files.
The File Upload dialog is displayed.
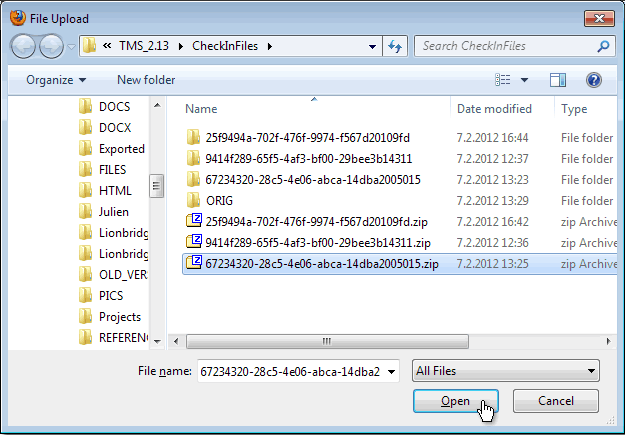
Browse and select the file to be uploaded and click Open.
The file is added to the Check-In dialog.
If you need to remove the file from the dialog, click the trash can icon on the right.
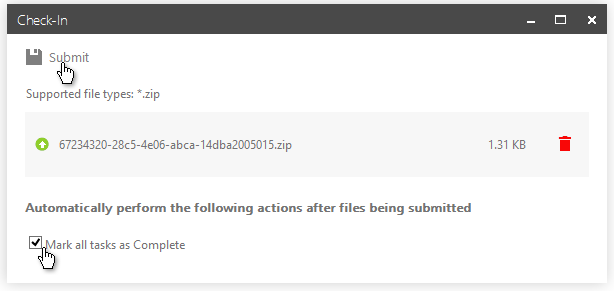
If you want also to mark the task completed, check Mark all tasks as Complete below.
Click Submit.
The Check-In dialog is closed.
If any errors happened during the Check-In, for example if you tried to check in wrong file package, Lionbridge Laꜞnguage Cloud™ Workflow displays errors in the view in which you started the Check-In.

If no error messages are displayed, the files have been submitted (and the task is marked as Complete).
You can also mark the task completed, check Mark all tasks as Complete in the Check-In dialog.
The Check-in gives an error message and aborts, if the ZIP file includes several files with identical name. This may happen when the same file is included in multiple sub-folders in the ZIP package.
You can also include other file types in the same ZIP file for delivery. The system recognizes an extra file as a deliverable, when the following naming convention is applied:
|
jobid # language-code # document-name.document-extension |
A deliverable file could then be named for example:
|
J6987# fr-fr # Deliverable Log.txt |
(The JobID is part of the directory structure of the ZIP package you checked out.)
Alternatively, you can include the deliverable files in a separate folder named "deliverables" in the check-in ZIP package. The "deliverables" folder can be located either at job or at language level.
Note: If you are uploading deliverables in this ZIP (in the Deliverables folder), leave the Job ID folder (ie. J123456) in the ZIP so that the deliverables are posted to the correct location in Lionbridge Laꜞnguage Cloud™ Workflow.
Any files added into the \Deliverables folder go to the \Deliverables area, except the translatable files (checked out with unique @nnn in their name) which should be checked in.
The translatable files are checked in from the \Deliverables folder by Lionbridge Laꜞnguage Cloud™ Workflow without any error messages.
Lionbridge Laꜞnguage Cloud™ Workflow compares the size of the files you check in to the size of the files you checked out. When the file sizes are identical, Lionbridge Laꜞnguage Cloud™ Workflow displays a warning message.
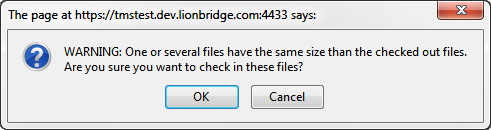
If you get the warning, please verify that you are checking in the correct files.
Finally the user has to set the task as Complete.
Please remember that you cannot undo the Complete command nor upload a file to a completed task. It is not checked, and you get no confirmation if a file has been uploaded (because some tasks may not require a file to be uploaded). Also because of this you have to be careful when completing the tasks.
A CTE task assignee cannot set the CTE Human and CTE Human Review tasks as Complete, Passed, or Failed in the Tasks view. The CTE Human and CTE Human Review tasks get normally completed after the task assignee submits a collection in CTE. This ensures that the task’s LTB report is saved. It also reduces mistakes, as you only need to submit the collection in CTE.
Project Administrators can still set CTE Human and CTE Human Review tasks as Complete, Passed, or Failed in the Status view. They can also set the status for multiple CTE tasks at the same time, but not for mixed selection of CTE and regular Human tasks.
Note: You can select several tasks and mark them all Complete simultaneously.
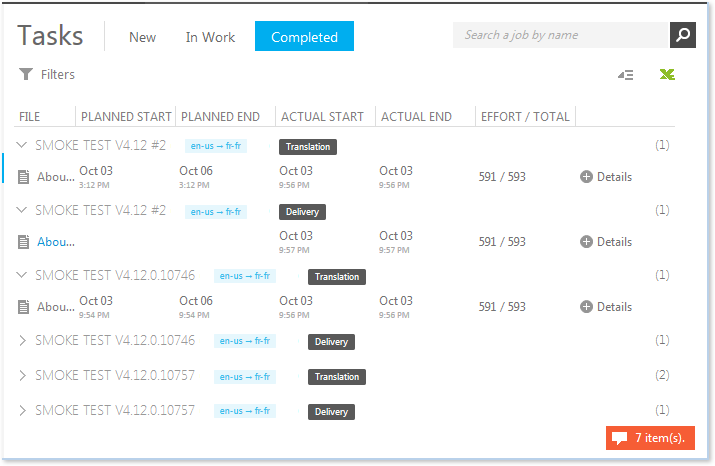
Once completed the tasks are moved to the Tasks | Completed view, which displays the tasks assigned to you completed in last 30 days.
After accepting a task, the user can also mark the task Unclaimed. By marking the task Unclaimed the user announces that she is not going to perform the task.
The status of the task is changed to Unclaimed and an alert is raised for the Project Administrators. The Project Administrator can then reassign the task to another user in the Planning view.
To mark the task Unclaimed, select it in the Tasks | In Work view, and select Unclaim in the Mark as context menu.
Lionbridge Laꜞnguage Cloud™ Workflow displays an Unclaim Task dialog, where the user can explain the reason for marking the task Unclaimed.
| Unclaim Task |
_ □ x |
Description
| Field/Value | Additional Information | |
|---|---|---|
|
|
Comment: * |
|
|
I cannot perform this task because of illness.
|
Insert the reason for unclaiming the task in this field. | |
| Save |
||
Clicking Save in the dialog removes the task from the user's tasks.
Lionbridge Laꜞnguage Cloud™ Workflow now sends you a notification if a task is unclaimed from you.
Note: No email is sent if you unclaim your own task.