The Tasks view displays the lists of New, In Work, and Completed tasks assigned to you.
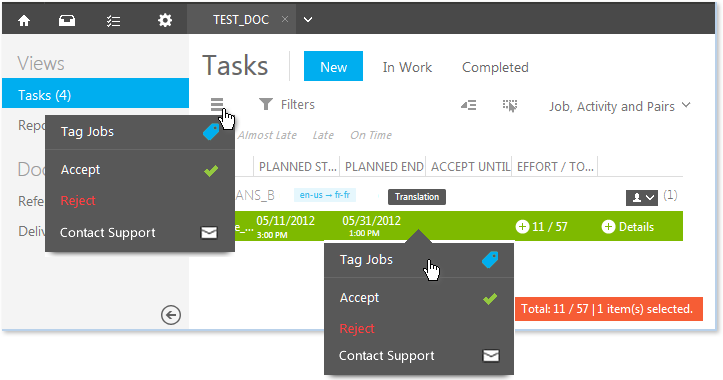
To accept a new task, open the Tasks | New view, select one or more tasks in the Tasks view, and click Accept in the Action menu. You can also click an item row and select Accept in the context menu.
Note: You cannot Accept a task assigned by an external assignment system from Tasks | New view context menu, not even if the task is selected together with a task processed in Lionbridge Laꜞnguage Cloud™ Workflow. Such actions are available in the external assignment system.
You can accept and reject tasks also on the Home Page Tasks tab by using the Action menu or the context menu commands.
Click Details on a package or a file line to open an inline pane with detailed information on the package or the file.
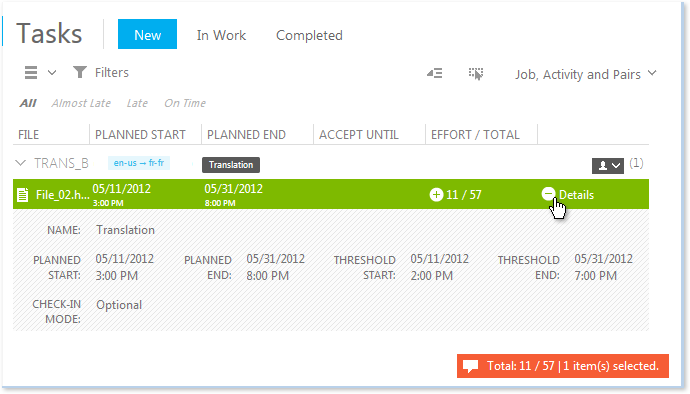
You can open an additional pane with detailed TM analysis word count results by clicking the concise wordcount information on the files in the task.
The additional information pane displays the total effort of the file word count in detail. To close the additional information pane, re-click the concise information. Opening any of the other additional panes closes the currently open pane.

Accepting a task moves it to your Task | In Work view for you to process further. Accepting an Approval task does not move it to your Task | In Work view.
When you try to accept a task at the same time as someone else accepts it, the following message is displayed:
"The task you tried to accept became no longer available to you."
To reject a task, open the Tasks | New view, select one or more tasks in the Tasks view, and click Reject in the Action menu. You can also click an item row and select Reject in the context menu.
Note: You cannot Reject a task assigned by an external assignment system from Tasks | New view context menu, not even if the task is selected together with a task processed in Lionbridge Laꜞnguage Cloud™ Workflow. Such actions are available in the external assignment system.
Rejecting a task indicates to the Project Administrator that you cannot take on the work. You cannot accept a task that you have rejected (unless the Project Administrator re-assigns it to you).
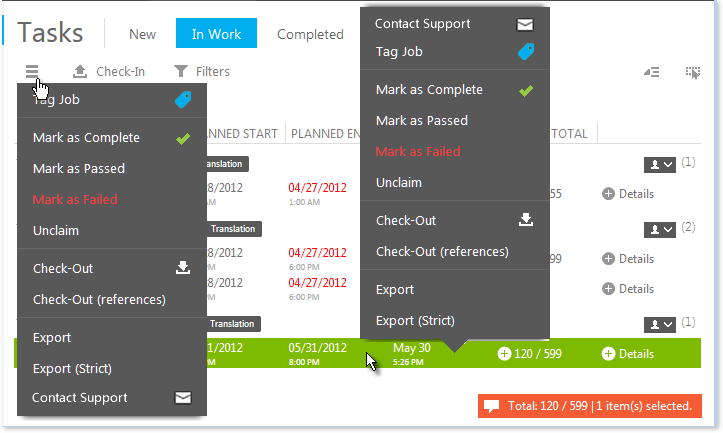
After you have accepted a task, you can export several files together from the In Work view by clicking Actionand selecting Export in the drop-down menu or by clicking one of the selected file rows and selecting Export in the context menu.
If you select Export (Strict), the original files are exported in their original (uploaded) folder structure, without added target language identifiers. The resulting folder structure is simpler than with the Export mode and exporting files for several languages or activities can result in overwriting files inside the generated zip package when the paths are identical for different languages or activities.
In the Tasks view the tasks are marked with visual indicators that represent how the Start Dates relate to the current day:
There is a Contact Support option in the context menu in the Tasks | New and the Tasks | InWork views for all assigned tasks (Human, Human Review, CTE Human and CTE Human Review).
By selecting the option, a task assignee can open the Contact Support dialog send a message to Support.
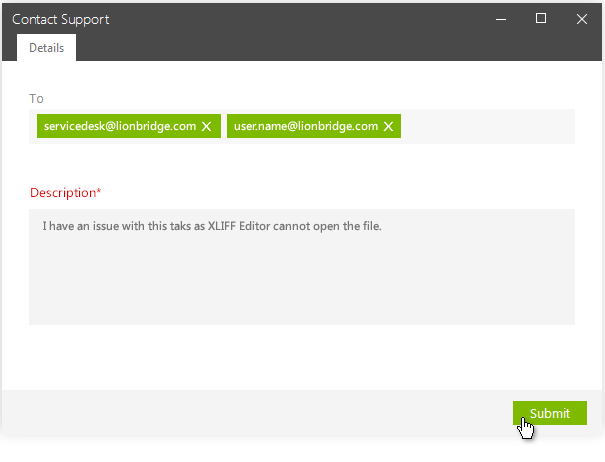
You can select the message recipient. Service Desk is available in the list, set as the default value. You can also insert a custom lionbridge.com email address to the recipient (To) field.
You must describe the problem in the plain text Description field. You can input text to describe the problem encountered in your own words inside the 3000 characters limit.
Click Submit to send the email message.
An email is then sent to recipient with the currently logged in user in the CC field.
This email contains following information: